प्रोजेक्ट अवलोकन
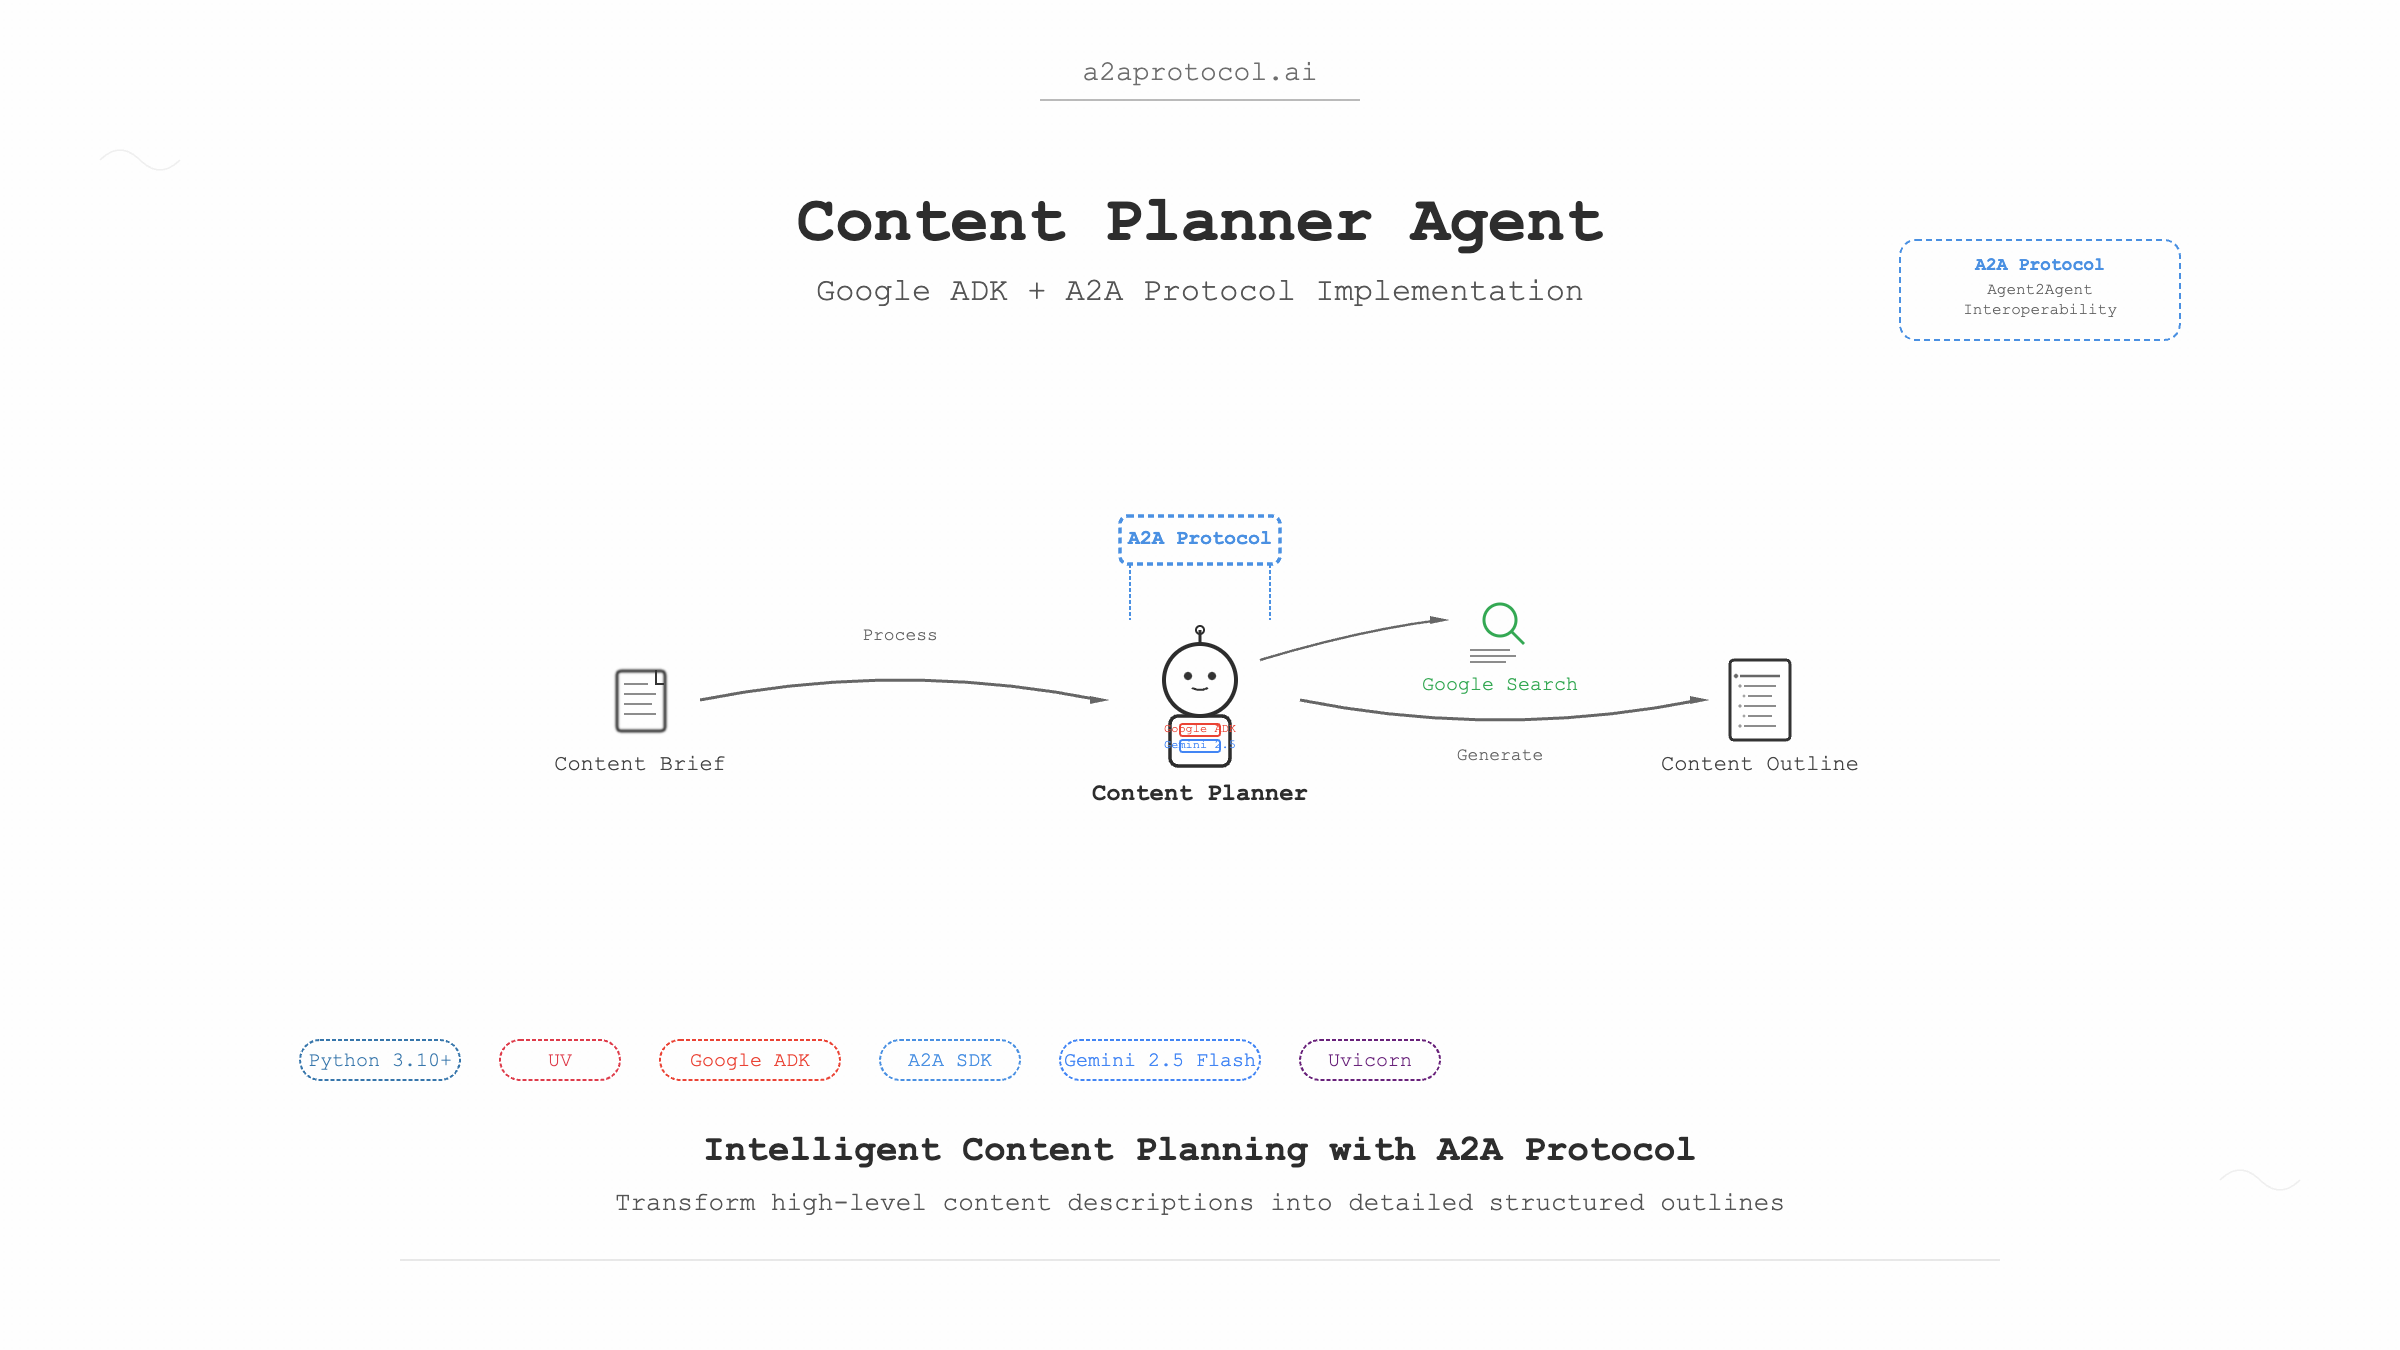
कंटेंट प्लानर एजेंट Google Agent Development Kit (ADK) और Python A2A SDK पर आधारित एक बुद्धिमान कंटेंट प्लानिंग एजेंट है। यह एजेंट उच्च-स्तरीय कंटेंट विवरण के आधार पर विस्तृत कंटेंट आउटलाइन बना सकता है।
A2A प्रोटोकॉल क्या है
A2A प्रोटोकॉल (Agent2Agent प्रोटोकॉल) AI एजेंट्स के लिए विशेष रूप से डिज़ाइन किया गया एक ओपन स्टैंडर्ड प्रोटोकॉल है। इसका मुख्य लक्ष्य विभिन्न प्लेटफॉर्म और तकनीकी स्टैक के बीच एजेंट्स की अंतर-संचालनीयता प्राप्त करना है, जिससे वे अंतर्निहित तकनीक की परवाह किए बिना "सहयोगियों" की तरह मिलकर कार्य पूरा कर सकें।
तकनीकी स्टैक
- Python: 3.10+
- UV: Python पैकेज मैनेजर
- Google ADK: Google Agent Development Kit
- A2A SDK: Agent-to-Agent संचार प्रोटोकॉल
- Gemini 2.5 Flash: बड़ा भाषा मॉडल
- Google Search: खोज उपकरण
- Uvicorn: ASGI सर्वर
पूर्व आवश्यकताएं
1. वातावरण सेटअप
सुनिश्चित करें कि आपके सिस्टम में निम्नलिखित सॉफ़्टवेयर स्थापित है:
# Python संस्करण जांचें (3.10+ आवश्यक)
python --version

# UV पैकेज मैनेजर स्थापित करें (यदि पहले से स्थापित नहीं है)
curl -LsSf https://astral.sh/uv/install.sh | sh
# या pip का उपयोग करें
pip install uv
2. API कुंजियां
Gemini मॉडल और Google Search कार्यक्षमता का उपयोग करने के लिए आपको Google API कुंजी प्राप्त करनी होगी:
- Google AI Studio पर जाएं
- एक नई API कुंजी बनाएं
- बाद में उपयोग के लिए कुंजी सहेजें
प्रोजेक्ट संरचना
samples/python/agents/content_planner/
├── __init__.py                 # पैकेज प्रारंभिक फ़ाइल
├── __main__.py                # मुख्य प्रवेश फ़ाइल
├── agent_executor.py          # एजेंट निष्पादक
├── content_planner_agent.py   # कंटेंट प्लानर एजेंट परिभाषा
├── pyproject.toml            # प्रोजेक्ट कॉन्फ़िगरेशन फ़ाइल
├── requirements.txt          # निर्भरता सूची
├── .env.example             # वातावरण चर उदाहरण
└── README.md               # प्रोजेक्ट दस्तावेज़
त्वरित प्रारंभ
चरण 1: प्रोजेक्ट क्लोन करें और डायरेक्टरी में जाएं
# मान लेते हैं कि आपके पास पहले से a2a-samples प्रोजेक्ट है
git clone https://github.com/a2aproject/a2a-samples.git
cd a2a-samples/samples/python/agents/content_planner
चरण 2: वातावरण चर कॉन्फ़िगर करें
# वातावरण चर उदाहरण फ़ाइल कॉपी करें
cp .env.example .env

# .env फ़ाइल संपादित करें और अपनी Google API कुंजी जोड़ें
echo "GOOGLE_API_KEY=your_actual_api_key_here" > .env
चरण 3: निर्भरताएं स्थापित करें और एजेंट चलाएं
# UV का उपयोग करके निर्भरताएं स्थापित करें और प्रोजेक्ट चलाएं
uv run .

# नोट:
वर्तमान एजेंट में "gradio>=5.30.0" की आवश्यकता नहीं है।
डिफ़ॉल्ट रूप से, एजेंट http://localhost:10001 पर शुरू होगा।
चरण 4: एजेंट का परीक्षण करें (नई टर्मिनल विंडो)
# CLI क्लाइंट डायरेक्टरी में जाएं
cd samples/python/hosts/cli

# एजेंट से कनेक्ट करें और संदेश भेजें
uv run . --agent http://localhost:10001
चरण 5: एजेंट के साथ बातचीत करें
CLI क्लाइंट में, आप इस तरह के संदेश भेज सकते हैं:
Create an outline for a short, upbeat, and encouraging X post about learning Java
कोड व्याख्या
1. मुख्य प्रवेश फ़ाइल (__main__.py)
@click.command()
@click.option("--host", default="localhost")
@click.option("--port", default=10001)
def main(host, port):
    # एजेंट कार्ड (मेटाडेटा)
    agent_card = AgentCard(
        name='Content Planner Agent',
        description=content_planner_agent.description,
        url=f'http://{host}:{port}',
        version="1.0.0",
        defaultInputModes=["text", "text/plain"],
        defaultOutputModes=["text", "text/plain"],
        capabilities=AgentCapabilities(streaming=True),
        skills=[
            AgentSkill(
                id="content_planner",
                name="Creates outlines for content",
                description="Creates outlines for content given a high-level description of the content",
                tags=["plan", "outline"],
                examples=[
                    "Create an outline for a short, upbeat, and encouraging X post about learning Java",
                ],
            )
        ],
    )
मुख्य घटकों की व्याख्या:
- AgentCard: नाम, विवरण, URL, संस्करण आदि युक्त एजेंट मेटाडेटा कार्ड
- AgentSkill: ID, नाम, विवरण, टैग और उदाहरण युक्त एजेंट कौशल परिभाषा
- AgentCapabilities: स्ट्रीमिंग समर्थन जैसी एजेंट क्षमता कॉन्फ़िगरेशन
2. एजेंट परिभाषा (content_planner_agent.py)
from google.adk.agents import Agent
from google.adk.tools import google_search

root_agent = Agent(
    name="content_planner_agent",
    model="gemini-2.5-flash",
    description=("Planning agent that creates a detailed and logical outline for a piece of content,"
                 "given a high-level description."),
    instruction=("You are an expert content planner. Your task is to create a detailed and logical outline for a piece"
                 "of content, given a high-level description."),
    tools=[google_search],
)
मुख्य विशेषताएं:
- Model: आधार LLM के रूप में Gemini 2.5 Flash का उपयोग
- Tools: प्रासंगिक जानकारी प्राप्ति के लिए Google Search उपकरण एकीकरण
- Instructions: एजेंट की भूमिका और कार्यों को स्पष्ट रूप से परिभाषित करता है
3. एजेंट निष्पादक (agent_executor.py)
class ADKAgentExecutor(AgentExecutor):
    def __init__(self, agent, status_message="Processing request...", artifact_name="response"):
        self.agent = agent
        self.status_message = status_message
        self.artifact_name = artifact_name
        self.runner = Runner(
            app_name=agent.name,
            agent=agent,
            artifact_service=InMemoryArtifactService(),
            session_service=InMemorySessionService(),
            memory_service=InMemoryMemoryService(),
        )
मुख्य कार्यक्षमता:
- Runner: एजेंट निष्पादन का प्रबंधन करने वाला ADK रनर
- सेवा घटक:
ArtifactService: उत्पन्न कलाकृतियों का प्रबंधनSessionService: सत्र स्थिति का प्रबंधनMemoryService: बातचीत मेमोरी का प्रबंधन
सिस्टम आर्किटेक्चर फ़्लो चार्ट
graph TB
    A[उपयोगकर्ता अनुरोध] --> B[A2A CLI क्लाइंट]
    B --> C[HTTP अनुरोध]
    C --> D[A2A Starlette एप्लिकेशन]
    D --> E[DefaultRequestHandler]
    E --> F[ADKAgentExecutor]
    F --> G[ADK Runner]
    G --> H[कंटेंट प्लानर एजेंट]
    H --> I[Gemini 2.5 Flash मॉडल]
    H --> J[Google Search उपकरण]
    I --> K[कंटेंट आउटलाइन जेनरेशन]
    J --> K
    K --> L[प्रतिक्रिया कलाकृति]
    L --> M[कार्य पूर्णता]
    M --> N[उपयोगकर्ता को परिणाम वापस करें]

    subgraph "ADK घटक"
        O[InMemoryArtifactService]
        P[InMemorySessionService]
        Q[InMemoryMemoryService]
    end

    G --> O
    G --> P
    G --> Q
विस्तृत निष्पादन प्रवाह
1. प्रारंभिकरण चरण
sequenceDiagram
    participant Main as __main__.py
    participant Agent as content_planner_agent
    participant Executor as ADKAgentExecutor
    participant Server as A2AStarletteApplication

    Main->>Agent: एजेंट कॉन्फ़िगरेशन लोड करें
    Main->>Executor: निष्पादक इंस्टेंस बनाएं
    Main->>Server: A2A सर्वर बनाएं
    Server->>Server: Uvicorn सर्वर शुरू करें
2. अनुरोध प्रसंस्करण चरण
sequenceDiagram
    participant Client as CLI क्लाइंट
    participant Server as A2A सर्वर
    participant Handler as DefaultRequestHandler
    participant Executor as ADKAgentExecutor
    participant Runner as ADK Runner
    participant Model as Gemini 2.5 Flash
    participant Search as Google Search

    Client->>Server: कंटेंट प्लानिंग अनुरोध भेजें
    Server->>Handler: अनुरोध रूटिंग
    Handler->>Executor: एजेंट कार्य निष्पादित करें
    Executor->>Runner: ADK रनर शुरू करें
    Runner->>Model: Gemini मॉडल कॉल करें
    Runner->>Search: Google खोज निष्पादित करें
    Model->>Runner: उत्पन्न कंटेंट वापस करें
    Search->>Runner: खोज परिणाम वापस करें
    Runner->>Executor: परिणाम मर्ज करें
    Executor->>Handler: कलाकृति वापस करें
    Handler->>Server: कार्य पूरा करें
    Server->>Client: कंटेंट आउटलाइन वापस करें
उन्नत कॉन्फ़िगरेशन
कस्टम पोर्ट
# निर्दिष्ट पोर्ट पर एजेंट शुरू करें
uv run . --port=8080
कस्टम होस्ट
# निर्दिष्ट होस्ट और पोर्ट पर शुरू करें
uv run . --host=0.0.0.0 --port=8080
वातावरण चर कॉन्फ़िगरेशन
आप .env फ़ाइल में अधिक विकल्प कॉन्फ़िगर कर सकते हैं:
GOOGLE_API_KEY=your_api_key_here
# आप अन्य कॉन्फ़िगरेशन आइटम जोड़ सकते हैं
LOG_LEVEL=INFO
समस्या निवारण
सामान्य समस्याएं
-
API कुंजी त्रुटि
त्रुटि: Invalid API key समाधान: जांचें कि .env फ़ाइल में GOOGLE_API_KEY सही है या नहीं -
पोर्ट पहले से उपयोग में है
त्रुटि: Port 10001 is already in use समाधान: दूसरा पोर्ट निर्दिष्ट करने के लिए --port पैरामीटर का उपयोग करें -
निर्भरता स्थापना विफल
त्रुटि: Failed to install dependencies
समाधान: सुनिश्चित करें कि UV सही तरीके से स्थापित है, uv sync आज़माएं
विस्तार और अनुकूलन
नए उपकरण जोड़ना
content_planner_agent.py में नए उपकरण जोड़ें:
from google.adk.tools import google_search, web_search

root_agent = Agent(
    # ... अन्य कॉन्फ़िगरेशन
    tools=[google_search, web_search],  # अधिक उपकरण जोड़ें
)
मॉडल संशोधित करना
root_agent = Agent(
    name="content_planner_agent",
    model="gemini-1.5-pro",  # अलग मॉडल का उपयोग करें
    # ... अन्य कॉन्फ़िगरेशन
)
कस्टम निर्देश
root_agent = Agent(
    # ... अन्य कॉन्फ़िगरेशन
    instruction=(
        "आप तकनीकी दस्तावेज़ीकरण के लिए एक विशेषज्ञ कंटेंट प्लानर हैं। "
        "कोड उदाहरण और सर्वोत्तम प्रथाओं सहित विस्तृत आउटलाइन बनाएं।"
    ),
)
सर्वोत्तम प्रथाएं
-
सुरक्षा:
- API कुंजियों को हमेशा वातावरण चर में संग्रहीत करें
.envफ़ाइलों को संस्करण नियंत्रण में कमिट न करें
-
प्रदर्शन अनुकूलन:
- उपयुक्त मॉडल आकार का उपयोग करें
- मेमोरी और सत्र सेवाओं को उचित रूप से कॉन्फ़िगर करें
-
त्रुटि हैंडलिंग:
- उचित त्रुटि हैंडलिंग और लॉगिंग लागू करें
- अर्थपूर्ण त्रुटि संदेश प्रदान करें
-
परीक्षण:
- यूनिट टेस्ट और एकीकरण टेस्ट लिखें
- विभिन्न इनपुट के साथ एजेंट प्रतिक्रियाओं का परीक्षण करें
सारांश
कंटेंट प्लानर एजेंट दिखाता है कि Google ADK और A2A प्रोटोकॉल का उपयोग करके बुद्धिमान एजेंट कैसे बनाएं। इस गाइड के माध्यम से, आपको निम्नलिखित में सक्षम होना चाहिए:
- संपूर्ण प्रोजेक्ट आर्किटेक्चर को समझना
- एजेंट को सफलतापूर्वक चलाना और परीक्षण करना
- आवश्यकतानुसार अनुकूलन और विस्तार करना
- सामान्य समस्याओं का समाधान करना
यह एजेंट पूर्ण कंटेंट निर्माण वर्कफ़्लो जैसे अधिक जटिल मल्टी-एजेंट सिस्टम बनाने के लिए आधार के रूप में उपयोग किया जा सकता है।
अधिक A2A प्रोटोकॉल उदाहरण
- A2A प्रोटोकॉल
- A2A मल्टी-एजेंट उदाहरण: संख्या अनुमान गेम
- A2A MCP AG2 बुद्धिमान एजेंट उदाहरण
- A2A + CrewAI + OpenRouter चार्ट जेनरेशन एजेंट ट्यूटोरियल
- A2A JS नमूना: मूवी एजेंट
- A2A Python नमूना: Github एजेंट
- A2A नमूना: ट्रैवल प्लानर OpenRouter
- A2A Java नमूना
- A2A नमूने: Hello World एजेंट
- A2A नमूना विधियां और JSON प्रतिक्रियाएं
- A2A प्रोटोकॉल के साथ LlamaIndex फ़ाइल चैट वर्कफ़्लो
Related Articles
Explore more content related to this topic
Implementing A2A Agents with ADK: Complete Development Guide
This guide provides a detailed introduction on how to use Google ADK (Agent Development Kit) framework to implement A2A (Agent2Agent Protocol) intelligent agent systems. From environment setup, project structure design to server-side and client-side agent development, covering the complete development process to help developers quickly build intelligent agent applications that support distributed communication.
A2A ADK Expense Reimbursement Agent
An intelligent expense reimbursement agent based on Google ADK and A2A protocol that automatically generates forms to supplement missing information and streamlines the reimbursement process.
A2UI Introduction - Declarative UI Protocol for Agent-Driven Interfaces
Discover A2UI, the declarative UI protocol that enables AI agents to generate rich, interactive user interfaces. Learn how A2UI works, who it's for, how to use it, and see real-world examples from Google Opal, Gemini Enterprise, and Flutter GenUI SDK.
Agent Gateway Protocol (AGP): Practical Tutorial and Specification
Learn the Agent Gateway Protocol (AGP): what it is, problems it solves, core spec (capability announcements, intent payloads, routing and error codes), routing algorithm, and how to run a working simulation.
Integrating A2A Protocol - Intelligent Agent Communication Solution for BeeAI Framework
Using A2A protocol instead of ACP is a better choice for BeeAI, reducing protocol fragmentation and improving ecosystem integration.